Showing posts with label Flash. Show all posts

Friday, February 21, 2014

A Little Detour To Revisit a Old Side Project

Hello everyone!

My buddy Andrew contacted me the other day and asked if I wanted to help him redo a lot of the stuff that we made for SpaceWings now that we have a bit more experience. So, we dredged up as many of the old files that we could and got to work figuring out what we needed to redo. He wanted to tackle most of the base code himself, while I took on getting the menus put together.

Unfortunately, the only assets we had from the original menus were screenshots. A bit of Photoshop magic and I had almost all the elements I needed. A major thing I was still missing was the font. None of the other guys that worked on it before that I talked to had the name of the font we used in the original. So, I had to find some new fonts. I then had to try and replicate the effects that Justin Bucher made for the originals. He's much more proficient at Photshop than I am though, but I did my best.

Here are some of the HUD assets:


Once I got the main aspects of the menus done I decided to start working on getting the pickup system working. This has four main parts to it: Picking up and classifying an item, adding to the inventory if applicable, updating the HUD if something was added to the inventory, and checking to see if the player has a particular item. 

Picking Up and Classifying

Getting the item to be picked up proved to be surprisingly difficult for me. I haven't really worked with skeletal meshes/skinning/animation before in UDK. I got almost all of it set up thanks to some help from Andrew, mostly setting up the anim tree. The part that kept throwing me off was the collision. To get collision on a static mesh is really easy, but I was having a trouble with a skeletal mesh. Turns out I was looking at too much code and over looked adding BlockNonZeroExtent = true default properties of the skeletal mesh component...

As for classifying it, there is a variable in the actual pickup that holds what type of pickup it is. When the pickup is touched it calls a function in the player controller class that takes that variable and decides what to do with it. Here is my base pickup class:

class SW_Pickup extends Actor abstract placeable ClassGroup(SW_Pickups); var string PickupType; var SpaceWingsPlayerController PC; var SpaceWingsPawn P; event Touch(Actor Other, PrimitiveComponent OtherComp, vector HitLocation, vector HitNormal) { PC = SpaceWingsPlayerController(GetALocalPlayerController()); P = SpaceWingsPawn(PC.Pawn); PC.MyLog("A" @ PickupType @ "Pickup was touched", 'PickupTouch'); //If the instigator is the player, then process the pickup if(Other == P) { PC.ProcessPickup(PickupType); Destroy(); } } defaultproperties { PickupType = "None" Begin Object Class=SkeletalMeshComponent Name=PickupMesh Scale3D=(X=1.0, Y=1.0, Z=1.0) CollideActors=true BlockNonZeroExtent=true End Object Components.Add(PickupMesh) CollisionComponent=PickupMesh bCollideActors = true bBlockActors = false CollisionType = COLLIDE_TouchAll }
And then all you have to do is extend off of that and add the relevant skeletal mesh properties in the defaultproperties of the child class and assign the item type to that variable I mentioned earlier. For example, here is the the red key card pickup class.
class SW_RedKeyCardPickup extends SW_Pickup; defaultproperties { PickupType = "RedKeyCard" Begin Object Name=PickupMesh SkeletalMesh=SkeletalMesh'SW_Meshes.KeyCard.KeyCard' Materials(0)=Material'SW_Meshes.KeyCard.RedKeyCard_Mat' AnimSets(0)=AnimSet'SW_Meshes.KeyCard.KeyCard_Anim' AnimTreeTemplate=AnimTree'SW_Meshes.KeyCard.KeyCard_AnimTree' PhysicsAsset=PhysicsAsset'SW_Meshes.KeyCard.KeyCard_Physics' End Object }

Adding To My Inventory

Adding it to the inventory was really simple. Since the inventory can hold a maximum of 3 items I didn't need to implement a grand inventory manager. For simplicity I assigned each pickup that could be added to the inventory a number instead of trying to save a class into the array, or something overly complex like that. I could have done a string, but I end up using the id number when updating the HUD. Here are the functions that manage my small inventory:
exec function AddItem(int ItemID) { local int i; if(ItemList.length < 3) { i = ItemList.length; ItemList.length = ItemList.length + 1; ItemList[i] = ItemID; HUDGFx.UpdateItems(); } else { MyLog("ItemList is full", 'AddItem'); } } function bool CheckForItem(int ItemID, out int FoundItemID) { local int i; local bool bHaveItem; bHaveItem = false; for(i = 0; i < ItemList.length; i++) { if(ItemList[i] == ItemID) { bHaveitem = true; FoundItemID = i; } } return bHaveItem; } //This would be used like this in whatever function needs the check //If not being called from this class, get PC reference like normal /* local int FoundID; if(CheckForItem(1, FoundID)) //If we have a keycard (ID 1) { RemoveItem(FoundID); //Insert the rest of the code that happens if they have the keycard } */ exec function RemoveItem(int ItemID) { ItemList.Remove(ItemID, 1); HUDGFx.UpdateItems(); }

Updating the HUD

Now that I have all of that in order I have to update the HUD to show which items I have in my inventory. As I do more and more Scaleform projects I try and migrate as much code as I can from AS3 to Unrealscript, since Unrealscript runs faster than AS3. Since I will be spawning movieclips directly from Unrealscript I have to keep a reference to them in order to adjust them or delete them. To help manage my references I decided to make my AttachMovie function a bit more dynamic on what parameters are passed. The first step was to create an array that holds the linkage names(to match the ones in Flash) and the desired instance names for all of the different item types that can be added to the inventory. The element number then corresponds to the ID I gave the items when I added them to the inventory. Here is how I have the AttachMovie and the reference array set up:
var struct ItemInfo { var string LinkageName; //Name used in Flash var string InstanceName; //Desired Instance Name } ItemReference; //ItemSlot[0] holds the id number of the item assigned to that spot. ItemOneSlot.AttachMovie(ItemReference[ItemList[0]].LinkageName, ItemReference[ItemList[0]].InstanceName); ItemOneMC = GetVariableObject("_root.itemOneSlot_mc." $ ItemReference[ItemList[0]].InstanceName); //In the defualt properties ItemReference[1] = (LinkageName = "redKeyCard_item", InstanceName = "redKeyCard") ItemReference[2] = (LinkageName = "blueKeyCard_item", InstanceName = "blueKeyCard")

CheckForItem Kismet Node

Since I like using Kismet for setting up triggers and other level specific things I needed a way to check if I had the correct item before the actual action could be executed. For instance, if they have the red keycard when trying to lower the force field. If they don't have it they shouldn't be able to lower it. So I made a custom Kistmet node that calls my check inventory function in my PlayerController class(see above), then outputs the correct result. I wanted to be able to set which item was being checked and also if I wanted it to be removed when the check was made. If I had like a master key card or something that could be used over and over again I wouldn't want it to be removed from my inventory. Anyway, here is my Kismet node:
class SeqCond_CheckForItem extends SequenceCondition; var bool bResult; var int ItemID; /**Remove the item if found? */ var(Items) bool bRemove; /**Expected Item Type*/ var(Items) enum ItemTypes { ITEM_RedKeyCard, ITEM_BlueKeyCard } ExpectedItem; event Activated() { local SpaceWingsPlayerController PC; PC = SpaceWingsPlayerController(class'WorldInfo'.static.GetWorldInfo().Game.GetALocalPlayerController()); bResult = PC.CheckForItem(ExpectedItem + 1, ItemID); if(bResult && bRemove) { PC.RemoveItem(ItemID); } //If the check result is true, activate the first output link, else the second OutputLinks[(bResult == true) ? 0 : 1].bHasImpulse = true; } defaultproperties { ObjName="CheckForItem" ObjCategory="SpaceWings" bRemove = true InputLinks(0)=(LinkDesc="In") OutputLinks(0)=(LinkDesc="True") OutputLinks(1)=(LinkDesc="False") VariableLinks(0)=(ExpectedType=class'SeqVar_Bool',LinkDesc="Result",bWriteable=true,PropertyName=bResult) }

Wow, this post ended up being a lot longer than I had anticipated. I was going to throw up a video of the pickups and HUD in action, but that will have to wait until later. Time to work!

Wednesday, February 5, 2014

Returns and Removing Children

Hello everyone!

I don't really have much to report on Winds of Commerce, I wrapped up the transaction list/receipts feature. When you bring up the receipts menu it will show you a list of all the cities you've been to, what day of the journey you visited it on, and how much you spent or earned there. You can then click on a city in the list and it will bring up an itemized list of what commodities you purchased/sold, how much you spent/earned on each commodity, and how much you spent on purchasing information.

The next thing I have to tackle is the navigation system. Right now I'm using exec functions to simulate going between cities. This will probably be the biggest system I've had to tackle developing this game. Unfortunately, before I can even start coding I have to get the routes figured out. That way I know how many days away each city is from one another and try and make the shortest route to each city. The hard part is trying to make it logical. Each time I get a route down I look at it and think, "Is that the most efficient route to that city?" then proceed to convince myself it isn't... and redo it again!

Returns


While I was working on getting this game put together I ran into how to use returns in a function. I had only used them a handful of times before, and didn't quite know how to use them. I knew you had to have 'return SomeVariable;' but I guess the usefulness didn't really hit me. Since I read more about them and did some tests I have started to use them more. I find them very useful for doing calculations, conversions, or simply checking if a function has completed running.
Setting up a function to return something is really simple, though it is different in Unrealscript and AS3. In Unrealscript the function setup looks like this:
function ReturnType FunctionName() { local ReturnType SomeVar; //Set SomeVar return SomeVar; }

Here is an example of a function that returns an int:

function int GetSum(int A, int B) { local int Sum; Sum = A + B; return Sum; } //To call use it Total = GetSum(5, 10); //GetSum would return 15

The return type can be any of the standard variable types: bool, int, string, array, and even a class. An example of a class being returned can be found in the GameInfo class, with the SetGameType function. This function returns the GameInfo class to use for the game.
static event class<GameInfo> SetGameType(string MapName, string Options, string Portal) { return Default.Class; }

A bool return can be useful if used in an if statement to make sure that function has ran completely before moving on with the if statement. An example of this is in a lot of the bot AI code that is floating around the internet. It is being used to make sure that a path has been found or not, basically:
if(FindPath()) { //Commence moving }

Return functions work the same in AS3, just with the different declaration. Here is how you would declare a retunr funciton in AS3:
function functionName():ReturnType { var someVar:ReturnType; //Set someVar return someVar; }

Speaking of ActionScript, in my last post I mentioned the different ways to call a function in AS3 from Unrealscript(ActionScriptVoid, ActionScriptBool, AsctionScriptInt, and so on). These are there to allow you to receive a return value from your AS3 function. For instance, if you had the GetSum function in AS3 and needed to call it from Unrealscript it would look like this:
//In AS3 function getSum(a:Number, b:Number):Number { var sum:Number; sum = a + b; return sum; } //In Unrealscript Total = ActionScriptInt("_root.getSum");

Now you have several examples of how to use a function to return a value!

Removing Children


The next code bit I found extends what I talked about in my last post with the removeChild function. Sometimes it is necessary to remove all the children from a MovieClip, and since there isn't a function for removeAllChildren there is a work around using a for loop. It's pretty simple, you get the number of children in the MovieClip, then go backwards through the children and remove them one at a time. Here is an example of what I'm talking about:

for (var i:int = container_mc.numChildren-1; i >= 0; i--) { container_mc.removeChildAt(i); }
I think that is all I have for you this week. Hopefully by my next update I'll have all of the routes figured out.

Saturday, January 25, 2014

Chuggin' Along - Winds of Commerce

Hey guys!

Just a quick update on Winds of Commerce. I've been steadily getting components of the code done. I recently finished up opening and filling the information page which will give you a random amount of information about the city you click on. From there you can purchase additional information if you'd like. I also decided to add a transaction list to the game, that way you can look back and see how much you spent, or made, at a given city and on what day that was on. It will also show you the net profit from each city.

While I have completed quite a few things, I still have a lot of work to do with the menus, choosing the starting options, and the end game.

Here is a neat bit of code I found while doing all of this that would have made some of my previous projects a little smoother. This allows you to create a movieclip in Flash, from Unrealscript. This helps because you then have an easier reference to dynamically created objects than you would spawning them through AS3. Here is the code to add the movie:
//In your custom GFxMovieplayer class var GFxObject RootMC, TestMC; RootMC = GetVariableObject("_root"); RootMC.AttachMovie("mySymbol", "myInstanceName"); TestMC = GetVariableObject("_root.myInstanceName");

This part of the code is pretty self explanatory. The function AttachMovie takes 4 parameters, but only two are required.
/** Attaches a symbol to specified movie instance. If no instance is found in this object's scope with the InstanceName, a new instance is created and returned */ native final function GFxObject AttachMovie(string symbolname, string instancename, optional int depth = -1, optional class<GFxObject> type = class'GFxObject');

The first parameter is the name of the linkage name you set in your Flash file.
The second is what you want the instance name to be of the newly created movieclip. You  can also set the depth of the new movie clip, or where it falls on the z-order in the SWF. The last parameter is what class to cast the return as, but I'm not entirely sure.

Now, even though they have a function to add a movieclip, they don't have one pre-built to remove one through Unrealscript. Matt Doyle, on the Epic Games forums, posted a work around(here) that works like a charm. First you'll need to create a new class extending from GFxObject. This will allow us to add the proper functions to remove the clip.
class GFxDisplayObject extends GFxObject; function RemoveChild(GFxObject childObject) { ActionScriptVoid("removeChild"); } defaultproperties { }

This will allow us to call the removeChild function easily on a movieclip cast to this class. When ActionScriptVoid(or similar, like ActionScriptBool, or ActionScriptObject) is called it will automatically pass whatever parameters are passed to the function that is calling it. In this case it will pass childObject onto the removeChild function in AS3. To actually make use of this you just need to add this line into your custom GFxMoviePlayer class:
//In your custom GFxMoviePlayer class GFxDisplayObject(TestMC.GetObject("parent", class'GFxDisplayObject')).RemoveChild(TestMC);

Here, you are grabbing the parent of the movieclip you want to remove, casting it into the custom GFxObject class you made, then calling the RemoveChild function of it, passing the desired movieclip. This line is really versatile since you don't have to set a hardcoded path to the object, since you are getting the parent.

Well enough rambling. hope this was helpful to someone.

Monday, January 6, 2014

And Now We're Back From Our Intermission!

Hey guys!

Sorry it's been so long, life has been hectic! Thankfully, my life has mellowed out a lot now, so I can get back on a regular updating schedule.

In the spare time I have had I've been dividing my time between working on that commerce game I mentioned in my last post, and helping a buddy with a game he's working on.

The premise of the trading game is you are the captain of a merchant ship. You can find more information here. You start off with a set amount of gold and you buy your first cargo with it. You then have a set amount of  'days' to go to different ports to try and make the greatest profit in that time. Each port, except the starting one will have randomized prices and quantities so each playthrough will be different. I've made some pretty good progress so far. I have the core system down for determining the value and quantity of the various goods, and I've almost finished up the information system in the game. This will allow you to get information on the different ports ahead of time, to help you plan. I still need to implement the actual buying and selling of goods though.

I've made a very simplistic mock up to give a representation of the game. To exit the trade and information windows just click them.


That's all I have for now. Once I get things a bit more organized I'll put up some interesting code bits, images, or something.

Saturday, November 2, 2013

AssetManager Is Complete!

Hey guys,

Been a while, but I am happy to say that AssetManager is as done as it is going to get. It is fully functional, and mostly pretty. It can be downloaded from here, if you want to give it a shot. The ReadMe that comes with it gives some instructions on how to use it, but almost all of it is self-explanatory.

For those of you who don't know, AssetManager is a project management tool that allows you to add projects and assets to keep track of all the things you are working on. It uses UDK for two reasons; one is because I'm too lazy to learn C++ or another language, and the second reason, ironically, is to learn how to use AS3 and Unrealscript for more complex tasks. Due to using UDK it is probably a much bigger file size than it needs to be. As I went through this project I did learn a lot about using config files, spawning items in AS3, and just managing a dynamic system in general. It was a  lot of fun to make, but I'm glad it's done. After working on that immediately after PrepHelp I was getting pretty burnt out on looking at mostly the same code.

Unlike PrepHelp I tried to make graphics for this. Overall I am unhappy with them, but it looks better than my placeholder graphics. If there is enough interest in the program I'll probably redo the graphics and fix the one (potential) bug I know of. The one thing I do like is the logo. It is kind of plain, but when it is smaller it looks better without realistic textures, which was what I was originally intending to do.


The only bug I can foresee is that you can add an item to a project even if there is no projects. Should have thought of that before, but I didn't. I know it sounds lazy to not go back and fix it, especially since it would be around 3 lines of code...and you're right! I want to be done with it for now, since it is starting to no longer be fun to work on. Since I'm not getting paid I figured that means it's a good time to wrap it up. Also, when your internet is so slow it takes 30-60 minutes to upload a file less than 200mb ...

I don't think I have anything else to add that isn't in the ReadMe. Now that this is out of the way I plan on working on a isometric, commerce strategy game. Just something small to see if I can do it and to get more practice with another type of game.

Friday, October 11, 2013

One Project Completed - PrepHelp

Hello everyone!

I should have posted this a little earlier, but time got away from me. I finished up the code stuff for PrepHelp. It now is a fully functional little program. Yippie! You can download it from here, but be warned: I have not improved the visuals past the mock ups I made for testing. I was planning on it but another idea came up that I will explain a little later. I did, however, provide a little instruction image pointing out what some of the more obscure, unlabeled buttons do.

I believe on my last post all I had left to do was set up the search feature, as well as implement the medical item category as well. The latter was very simple, just copy, paste, change a few names, and done. The search function...at first I thought it'd be easy, just do a check against the types and it will find them and sort them. Well, I was partially right. Actually finding the elements was the easy part, the hard part was figuring out how to display just the search results without overwriting my existing inventory.

Since I wanted to find all of the elements in the array that matched the given item type I found that the Array.Find() function wouldn't suit my purposes without a bunch of work. Instead I created a for loop, where on each element it would check if the item type matched the searched type. Here is an example below.

function SubmitSearch(string TempType) { local GFxObject DataProvider; local GFxObject TempObj; local int j; //Clearing the temp array PP.TempFoodInv.length = 0; for(i = 0; i < PP.FInv.length; i++) { if(PP.FInv[i].T == TempType) { j = PP.TempFoodInv.length; PP.TempFoodInv.length = PP.TempFoodInv.Length + 1; PP.TempFoodInv[j].N = PP.FInv[i].N; PP.TempFoodInv[j].T = PP.FInv[i].T; PP.TempFoodInv[j].Q = PP.FInv[i].Q; PP.TempFoodInv[j].E = i; //Setting the temp element number to i so it will show where it is in the food inventory PP.TempFoodInv[j].D.Y = PP.FInv[i].D.Y; PP.TempFoodInv[j].D.D = PP.FInv[i].D.D; PP.TempFoodInv[j].D.M = PP.FInv[i].D.M; } } //If any matches were found, draw the new inventory if(PP.TempFoodInv.length > 0) { bFood = true; DataProvider = CreateArray(); for(i = 0; i < PP.TempFoodInv.length; i++) { TempObj = CreateObject("Object"); TempObj.SetString("FoodItem", PP.TempFoodInv[i].N); TempObj.SetString("Type", PP.TempFoodInv[i].T); TempObj.SetInt("Quantity", PP.TempFoodInv[i].Q); TempObj.SetInt("Element", PP.TempFoodInv[i].E); TempObj.SetInt("ExpY", PP.TempFoodInv[i].D.Y); TempObj.SetInt("ExpD", PP.TempFoodInv[i].D.D); TempObj.SetInt("ExpM", PP.TempFoodInv[i].D.M); DataProvider.SetElementObject(i, TempObj); } RootMC.SetObject("foodInvo", DataProvider); ActionScriptVoid("_root.clearInvo"); ActionScriptVoid("_root.drawFoodInvo"); } //If no matches were found, show an error else { ActionScriptVoid("_root.spawnSearchError"); } }

If the for loop found an element it would copy it to a new array. After it finished searching the entire array the temp array would be sent over to the SWF to be displayed. This way, my original item array would remain intact and I would only be displaying the contents of the found items.

Now, to talk about the idea that got in the way of redoing the graphics for PrepHelp. I have been calling it AssetManager, but the name will probably change. Basically it is just a remake of PrepHelp, but focused on helping keep track of the different assets needed for the projects I'm working on. I hope this can help me, and possibly others, keep track of how many things they need to work on, when they're due, and at what stage of development they are at. I could just take PrepHelp and rename few things and call it good, but that just isn't good enough.

While I was figuring out how to do the search feature I thought of a better way of doing things to make the whole system more dynamic. I figured if it was going to help you keep track of all the assets for every project you are working on it will have to be more flexible than having only two set categories(like food and medical in PrepHelp). So I am in the process of reworking it to allow user added categories with their own asset lists. This way a person can add as many projects as they would like, and the system would still work perfectly. I do plan on making graphics for AssetManager though, since I will probably be using it more than PrepHelp.

One feature I wanted to add, but couldn't figure out until a couple days ago was having a auto adjusting thumb on a scroll bar. Meaning, if you only had a couple items the thumb on the slider would be really big, while it would be a lot smaller if you had a bunch of items. That way you wouldn't have to drag as far to move a few items up, just like on a webpage. I have a working version, though it could use some tweaking if I can figure out to... Anyway here is the first version of it, using the inventory test I made a couple months ago and put up on my blog.


That's all I have for now. When I get the rest of the code wrapped up for AssetManager I'll fill in more detail on how I went about doing some of that stuff.

Sunday, September 29, 2013

My Good Friends, Sort() and e.target.parent! - PrepHelp

Hello everyone!

Just a quick little update on PrepHelp. Since my last post I've worked out quite a few bugs. Here's a few things I got working:

  • Expiration date checking
  • Edit an existing item
  • Sort items by name, type, quantity, or expiration date
To check to see if the item is close to expiring gave me quite a bit of trouble. My initial thought process was to convert the dates into a separate number. For instance let's use 12/24/14 as our example date. The day would be the base number, so 24. Then you would add 100 for every month, which would bring us to 1,224. Then you could add 10,000 for every year, then compare the two numbers to see if the current day is still before the expiration date. As I'm sitting there I'm thinking to myself that this is not the way to try and check something like this. It's just nuts to complicate it like that. What I ended up doing was something more logical, and I hope a good way to do it. Basically, when I check the date I work backwards, starting with checking if the current year is the same, before, or after the expiration year. If it is the same year I then do the same check for the month, then the day. If it is within one month of expiring it will change a movie clip as a warning, then if the expiration date has passed it changes that movie clip again stating it is expired.

Here's the code that I came up with:
/* Since the add item date only has the last two numbers of the year we have to add 2000 since the date chek in unrealscript has a 4 digit year */ //If it is the same year, check if it is the same month if(foodInvo[i].ExpY + 2000 == currentYear) { //If so, check if it is the same day if(foodInvo[i].ExpM == currentMonth) { //If so, say it is expired if(foodInvo[i].ExpD <= currentDay) { item.expMarker_mc.gotoAndStop(3); } //If not, flag it as about to expired else if(foodInvo[i].ExpD >= currentDay) { item.expMarker_mc.gotoAndStop(2); } } //If the expiration date is a month away, flag it as about to expired else if(foodInvo[i].ExpM == currentMonth + 1) { item.expMarker_mc.gotoAndStop(2); } //If it is past the expiration year, flag as expired else if(foodInvo[i].ExpM < currentMonth) { item.expMarker_mc.gotoAndStop(3); } } else if(foodInvo[i].ExpY + 2000 < currentYear) { item.expMarker_mc.gotoAndStop(3); }

This helped me get the sort by date feature figured out as well, since it is basically doing the same thing. With the sort feature I used a delegate for the first time. Very interesting stuff, though kind of confusing. Basically a delegate allows you to use a function as a variable, sort of. In the case of the Array.Sort(delegate) function the sort function calls the delegate and the delegate takes parameter A and parameter B, compares them, and returns either -1(If your statement is true) or 0(If your statement is false). If -1(If I read the inline if statement correctly) is returned then the two elements in the array that are being compared will be switched. 

For sorting by date I ended up doing a little bit of my crazy number adding, though just by 1 or 2 instead of thousands. Since it is comparing two values and returning the larger I ended up adding or subtracting from one or the other depending on if the year/month/day were before or after the other.

Here is what the final code looked like:
//Calling the correct delegate switch(SortType) { case "Qty": //If SortType is quantity //use the SFBQ delegate FInv.Sort(SFBQ); break; case "Date": //If it is date, //use SFDB instead FInv.Sort(SFBD); break; default: FInv.Sort(SFBQ); break; } //The delegates //Sort Food By Quantity delegate int SFBQ(Food A, Food B) { //If sort quantity ascending is true if(bQUp) { //If FoodA.Quantity is greater //than FoodB.Quantity return A.Q > B.Q ? -1 : 0; } else { return A.Q < B.Q ? -1 : 0; } } //Sort Food By Date delegate int SFBD(Food A, Food B) { local int TempA, TempB; //If Year A is greater than B add 1 to A; if(A.D.Y > B.D.Y) { TempA += 1; } //Else, add 1 to B else if(A.D.Y < B.D.Y) { TempB += 1; } //If both have the same year, repeat down //through month and day. else if(A.D.Y == B.D.Y) { if(A.D.M > B.D.M) { TempA += 1; } else if(A.D.M < B.D.M) { TempB += 1; } else if(A.D.M == B.D.M) { if(A.D.D > B.D.D) { TempA += 1; } else if(A.D.D < B.D.D) { TempB += 1; } } } //If sorting Date ascending is true if(bDUp) { return TempA > TempB ? -1 : 0; } else { return TempA < TempB ? -1 : 0; } }

The other sorts were pretty straight forward since it would automatically check if the strings/ints were equal or not.

When I got around to adding the edit item I took almost all of the code for it from my add item popup. One thing I did change, though, was when the edit item popup comes up it will already have the information of the item being edited in the textfields. This would allow the user to change only what was necessary instead of having to re-input all of the information again. To do this I made use of the e.target.parent variable in Flash. Since the items are being added dynamically through code I found using the e.target or e.currentTarget keywords to be really helpful since it stores what movieclip/button that was the target of the event(Like the editItem_btn on a MouseEvent.CLICK event). One thing I had an issue with was that my target was my editItem_btn and all the information I wanted to access, so I could fill the edit item textfields, was in the parent movieclip item_mc. I tried several variations of parent.e.target and MovieClip(parent).e.target until I got e.target.parent. Then I could access my other textfields and all was well.

Anyway, hope that helps someone. Back to working on the search functionality!

Monday, September 16, 2013

Another Roadblock Avoided - PrepHelp

Hey guys!

In my last post I talked about the code project I was working on called PrepHelp. Over the past week and a half I have figured out most of the functionality for it. I have adding items, removing items, and am working on saving/loading inventory items to/from a config file.

To add an item I created a popup where you can enter any name, quantity, and expiration date. I also had to create a custom dropdown menu since I ran into issues when I tried the default component menu, as well as the Scaleform CLIK menu. With the default menu that comes with Flash it turns out it is not compatible, so while it works great in a strictly Flash project it throws errors when used with Scaleform. The CLIK one on the other hand has some issues where the dropdown part of the menu gets drawn over all other things in the swf, including the cursor(If you have the cursor in the same file). There are several workarounds, but I wanted the challenge plus this allows me to have more control over the graphics when I get to that part.

Also, if you forget to fill in all of the textfields on the Add Item popup then it will display an error and won't let you add the item till you fill the empty field.

When it came time to work on getting the saving and loading I ran into a pretty big problem...You can't save arrays to a config file. This should have been the first thing I checked before I started on this project, not after I have almost all of the framework done. Since the main reason I chose UDK over a strictly Flash based project was to utilize the config files.

Luckily, I found a post on the forums alluding to using a function to append/split a string and use that variable since you can save a string to a config file. Intrigued, I scoured the internet to find this magic function. After trying the wrong function I found the correct one. It is called SplitString. It is pretty handy. The first parameter is the string you wish to split. The second parameter is the delimiter, or what it looks for to know where to split it. The third is optional and it just asks if you want to cull empty elements. All of these broken up chunks are then stored in an array that is returned by the SplitString function. Here is an example of how I am using it to load my test inventory:

var config string FoodName; function LoadFoodInventory() { local array<string> FoodNameArray; FoodName = "How,now,brown,cow,this,goes,around,the,world"; FoodNameArray = SplitString(FoodName, ",", false); for(i = 0; i < FoodNameArray.length; i++) { FInv.Length = FInv.Length + 1; FInv[i].N = FoodNameArray[i]; } }

And as promised here are some screen shots of PrepHelp:

The test inventory using the SplitString function,
loaded from a config file.

The Add Item popup with custom dropdown menu.

Inventory after new item has been added.
From here I think it will mostly be copying existing code and fitting it for the medical inventory. and getting the search function all set up. I also have to get the expiration date thing implemented as well. I have a plan to tackle that, but it will just be a matter of plugging it in and seeing how it goes.

Well, that is all I have for now. Hopefully by next week I'll have the code wrapped up and started working on the visuals for it.

Wednesday, September 4, 2013

A Small Side Project - PrepHelp

Hey there!

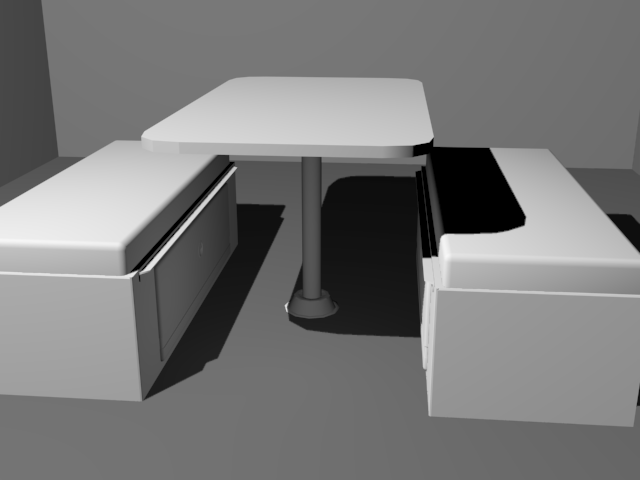
Since we are waiting on models for N'Ferno, the firefighting game, and some more of the code base I decided to do a couple personal projects. I decided to start a small modeling project, and a larger code/design project. For the modeling I started modeling components of a camper van I own. I figured it was something I have ready access to and should be a nice little project. I wanted to do somewhat low poly, though have enough to make the objects look nice without going into a lot of detail. I finished up the dinette(the table and seats) and am working on the cabinet where the stove, fridge, sink, and electrical stuff is.

Here is the dinette:


When I get done with all of the models I want to go through and texture everything. Since I think texturing is my weakest point, this should be a good little exercise.

For my other project I had an idea to make a program to help people keep track of their long term food stores and medical supplies. This could be useful if you are prepping for the apocalypse or if you have food stored away in case of flood/hurricane/tornado or other natural disaster. The program would offer basic functionality. You would have the ability to add items into either medical or food items. Each item will have an expiration date, quantity, subcategory, and name. When viewing the list it will let you know if a particular item is getting close to its expiration date. There will also be a search function where you can search by subcategory(i.e. under food would be: grains, beans, meat, etc...) to help keep track of what items you have.

Due to the fact I haven't learned any other language besides UnrealScript and AS3 I decided to make it using UDK. I realize it isn't the best platform to make something like that in, but it is what I know. Eventually I will sit down and learn C++ or another language, but for now I'm working on expanding my knowledge of how to do things using UDK.

When I have the main body built I will post some pictures and possibly some code that I used to achieve it.