Showing posts with label game development. Show all posts

Sunday, April 19, 2015

Loot Tables Code - Heroes' Journey

Hello all!

This is a continuation of my previous post, here, where I went over the design side of my Loot Tables. This post will go over the actual code I am using to implement the logic from the last post.

Code                                                                                   

The first thing we need are our variables: our List of entries, an int to store the total of all the weights, a List to hold the weight converted to percentages, and a List to hold the cumulative percentages that we check against.

private List<LootTableEntry> lootEntries = new List<LootTableEntry>(); //The sum of all of the entries' weights private int totalWeights = 0; //Item weights as overall percentages private List<int> weightPercentages = new List<int>(); //The cumulative percentage table to check against private List<int> cumulativePercentages = new List<int>();
I also made a method that makes it easier to add an entry,  I use this in child classes' constructors to build the Entry list.

protected void AddNewEntry(int probability, params BaseItem[] items) { lootEntries.Add(new LootTableEntry(probability, new List<BaseItem>(items))); }
Here is my LootTableEntry class for reference.

using UnityEngine; using System.Collections; using System.Collections.Generic; public class LootTableEntry { public List<BaseItem> Items = new List<BaseItem>(); public int Weight = 0; public LootTableEntry(int weight, List<BaseItem> items) { Weight = weight; Items = items; } }
After I add all of the entries I call a method that initializes the Loot Table (which fills out the other variables we declared earlier)

protected void InitTable() { GetTotalWeights(); GetWeightPercentages(); GetCumulativePercentages(); }
The first method called by InitTable is GetTotalWeights. This just iterates through all of the entries add gets a sum of all their weights.

private void GetTotalWeights() { totalWeights = 0; //Add all of the items' Weights together foreach (LootTableEntry entry in lootEntries) { totalWeights += entry.Weight; } }
The second method is GetWeightPercentages. This iterates through all of the entries again and divides their weights by the total to get their actual percentages.

private void GetWeightPercentages() { weightPercentages.Clear(); for (int i = 0; i < lootEntries.Count; i++ ) { //Get the probability of the item based upon the total probability int percent = Mathf.RoundToInt(((float)lootEntries[i].Weight / (float)totalWeights) * 100); weightPercentages.Add(percent); } }
The last method InitTable calls is the GetCumulativePercentages. This is where I build the list to check against. The first thing I do is add a 0 to the list as the first element, this will give me the lower bounds for checking the first range. Next, I go through each element in the weightPercentages List. On each element add it to the running total and add the new total to the cumulatvePercentages List. The final element should bring the total up to 100.

private void GetCumulativePercentages() { cumulativePercentages.Clear(); int cumulativePercent = 0; cumulativePercentages.Add(cumulativePercent); for (int i = 0; i < weightPercentages.Count; i++) { //Add the new item's probability cumulativePercent += weightPercentages[i]; //add the new percent as the key, and the index of the associated entry as the value cumulativePercentages.Add(cumulativePercent); } }
Here is an example LootTable that I based the logic examples off of.

using UnityEngine; using System.Collections; public class LT_Test : BaseLootTable { public LT_Test() { AddNewEntry(5, new AT_SimpleClothJerkin(), new AHD_SimpleLeatherCap()); AddNewEntry(15, new WM_SimpleLongSword()); AddNewEntry(60, null); InitTable(); } }
After a battle I need to get which Loot Entry the player will receive. I have a method called GetLoot that picks a random number and checks the ranges in the cumulativePercentages list. Then it returns the Entry in the lootEntries List that has the 'found' index.

public List<BaseItem> GetLoot() { int check = Random.Range(1, 101); for (int i = 0; i < cumulativePercentages.Count - 1; i++) { //Check if the random number we generated is between this set of values if (check > cumulativePercentages[i] && check <= cumulativePercentages[i + 1]) { return lootEntries[i].Items; } } return new List<BaseItem>(); }
And here is the full BaseLootTable class

using UnityEngine; using System.Collections; using System.Collections.Generic; public class BaseLootTable { private List<LootTableEntry> lootEntries = new List<LootTableEntry>(); //The sum of all of the entries' weights private int totalWeights = 0; //Item weights as overall percentages private List<int> weightPercentages = new List<int>(); //The cumulative percentage table to check against private List<int> cumulativePercentages = new List<int>(); protected void InitTable() { GetTotalWeights(); GetWeightPercentages(); GetCumulativePercentages(); } public List<BaseItem> GetLoot() { int check = Random.Range(1, 101); for (int i = 0; i < cumulativePercentages.Count - 1; i++) { //Check if the random number we generated is between this set of values if (check > cumulativePercentages[i] && check <= cumulativePercentages[i + 1]) { return lootEntries[i].Items; } } return new List<BaseItem>(); } private void GetTotalWeights() { totalWeights = 0; //Add all of the items' Weights together foreach (LootTableEntry entry in lootEntries) { totalWeights += entry.Weight; } } private void GetWeightPercentages() { weightPercentages.Clear(); for (int i = 0; i < lootEntries.Count; i++ ) { //Get the probability of the item based upon the total probability int percent = Mathf.RoundToInt(((float)lootEntries[i].Weight / (float)totalWeights) * 100); weightPercentages.Add(percent); } } private void GetCumulativePercentages() { cumulativePercentages.Clear(); int cumulativePercent = 0; cumulativePercentages.Add(cumulativePercent); for (int i = 0; i < weightPercentages.Count; i++) { //Add the new item's probability cumulativePercent += weightPercentages[i]; //add the new percent as the key, and the index of the associated entry as the value cumulativePercentages.Add(cumulativePercent); } } protected void AddNewEntry(int probability, params BaseItem[] items) { lootEntries.Add(new LootTableEntry(probability, new List<BaseItem>(items))); } }
That is how I implemented my Loot Tables, I'm sure there are better ways of doing it, but this works fine for this game. Anyway, I hope this helps someone develop a loot system for their game.

Loot Tables Overview - Heroes' Journey

Hello everyone!

In this post I wanted to go over how I designed the loot tables in Heroes' Journey. This was one area where I was having a lot of trouble coming up with a good way to implement random loot at the end of battle. So, I turned to the Internet in hopes of finding examples of how other games/people had approached this before. I found a lot of good examples of loot systems, like the ones here at Gamasutra, the Game Development Stack Exchange, and several others. I really liked the table style implementation, like the main example in the Gamasutra article, and decided to go with a variation of that one. I'll go through the logic first, then show a code example of how I implemented that logic.

I was going to do this as one long post, but it being a little too long. Instead I'll do an overview of the logic behind my Loot Tables, and in the next post go over how I actually implemented it in code. This can be found here.

Logic                                                                                  

The first thing that is needed is a list that holds the entries to our loot table. My entries consist of a probability (weight) and an item collection (this allows me to drop sets of items). For this example loot table we will have the following entries:


If you noticed the Weights do not add up to 100. As the linked tutorials explain, these numbers are more to show how probable that entry is to be dropped compared to the other entries in the list. We'll get the 0%-100% percentages next. To do this all we have to do is get the sum of all of the weights, then divide each of the weights by the total. Next multiply by 100, and round it to get a whole number percentage.


This means we have a 6% chance to get the Simple Cloth Jerkin/Leather Cap set, a 19% chance to get a Simple Long Sword, and a 75% chance to get nothing. So we have the different probabilities of each of our entries, now we need to put them into a table that we can check our random number against. To do this you start at 0, and for each entry just add that percent to the running total. The last one should always end up at 100.


This table gives us an upper and lower bound to check our random number against. Say we got a random number of 17. So we have 0 - 6 is the armor set, 7 - 25 is the long sword, and 26 - 100 is nothing. We can see that the random number would fall in the 7 - 25 range, therefore we would get the Simple Long Sword as our drop.


This way also allows you to order the entries which ever way you'd like. If you wanted the rarer items to be at the lower end of the 0 - 100 range then you just add them to the list first. In this case, since the lower the number the rarer the drop, anything you take off the random number will increase your chance of getting a rarer item.

That is the logic I am using for determining which drop the player will get at the end of the battle.

Saturday, April 18, 2015

Update on Heroes' Journey

Hello everyone!

I wanted to give you an update on what has happened on Heroes' Journey since my last post. In my last post I went over the Characteristics (Abilities/Attributes/Stats) that I am using in the game and I only had the basic damage calculations done. I have made a lot more progress since then. Here are just a couple brief descriptions of what has been implemented:

  • Battle now supports using skills (which apply Buffs/Debuffs), as well as basic damage and skipping your turn. 
  • Skills now use Action Points to use, and you regenerate AP at the beginning of each turn
  • Damage calculations now take into account modifiers from armor, weapons, buffs, and debuffs
  • Attacks/Skills now support the ability to target different groups, like Self, Friend, or Foe.
  • If you are victorious you now receive gold, XP, and loot based upon the enemy types that were defeated. 
  • All of the base classes created for Enemies, all Item types, Skills, Buffs, and Debuffs
I have a little more work too for dispersing gold and loot, since when I initially wrote it I didn't take into account that the player party will be pooling gold and loot to make it less of a hassle to manage your items. That should be a pretty quick fix, then I can start creating enemies, items, skills, and so on so I can actually start testing the system under different circumstances.

I wanted to go over how I am handling the loot tables, but I plan on doing that as a separate post, since I have a feeling it will be a little lengthy.

Another thing I wanted to throw out there is that I started using Microsoft OneNote since my last post that has helped a lot for organization and motivation. It's free, and I recommend giving it a shot. 

The program is comprised of Notebooks, Sections, and Pages. Notebooks hold Sections and Sections hold Pages. This is how I set it up:

Notebook: Project/Game Name
Sections: Major components of the game. For instance, Mechanics, Story, Work Log, Project Timeline, and so on.
Pages: A breakdown of the above subcategories, This is where all of the actual details are written down.

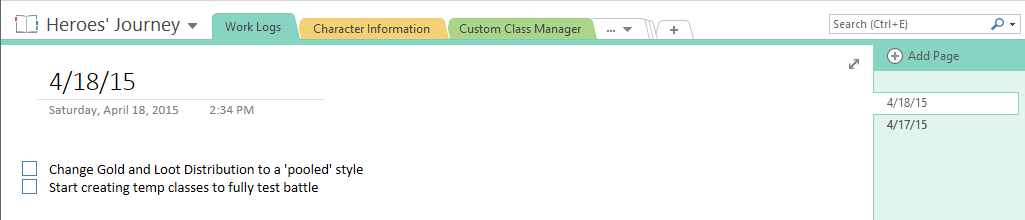
I started doing my daily work logs in OneNote and it has helped a lot for keeping track of what I did on what day, and what persistent issues I need to tackle.

For instance, if I have two items on my To-Do list on one day and get one done it would look like this:


The next day I work on the game I copy over the tasks that are not complete, and add any new items I run in to as well:


This allows me to have a rolling log of tasks that need to be completed, and if need be I can check what changed between one day and the next and figure out what all I did on a given day.

Another nice feature is you can share it across multiple devices/users so it makes it really easy to collaborate with team members, or takes notes from your phone when you get an idea.

Anyway, catch ya in the next post!


Sunday, March 8, 2015

Characteristics Breakdown - Heroes' Journey

Hey guys!

Today I wanted to go over the stats system  I am using for the game I mentioned in the my last post, whose working title is Heroes' Journey until I can think of a better name.

I have played quite a few RPGs, both electronic and table top that use stat systems that are fairly complex to support the wide variety of actions a player can take. Some example video games would be any of the Elder Scrolls games, the Divinity series, Adventure Quest, just to name a few. For table top games, any of the D20 tabletop RPGs (D&D, Star Was) or Legend of the Five Rings (L5R). All of these games have very robust stat systems that allow for very diverse play. For Heroes' Journey I didn't think a large stat system was necessary so I went about creating a simpler stat system that was more focused on the gameplay elements the game would have. For instance, there is not going to be any non combat skills (Lock picking, diplomacy, crafting, etc) so I didn't need to have stats specifically to support those types of actions.

I also wanted to create a system that I hadn't seen very often. A lot of the systems take those stats and create a modifier from them to apply to other actions. With the D20 rule set you have an ability modifier that is derived from your overall ability score (a Dexterity of 18 would give you a +4 ability modifier). When you go to use a skill you apply the ability modifier that is associated with that skill (you would add your Dexterity modifier to a Move Silently skill roll). In the system I developed there are 4 Base Characteristics (BCs) and 6 Derived Characteristics (DCs). You apply points into the Base Characteristics and the Derived Characteristics are calculated from the Base, hence Derived. The Characteristics are:

Base:
- Agility
- Brawn
- Focus
- Fortitude


Derived:
- Action Points
- Defense
- Health
- Melee Attack
- Ranged Attack
- Resistance

Each Base Characteristic has one primary, and two secondary Derived Characteristics that they affect. The Primary Derived Characteristic receives 60% of the Base Value, and each Secondary Derived Characteristic receives 20%, both rounded down to the nearest whole number. They are divided out like this:

Base (Primary, Secondary, Secondary)
Agility (Defense, Melee, Ranged)
Brawn (Melee, Health, Resistance)
Focus (Ranged, Action Points, Defense)
Fortitude (Health, Action Points, Resistance)

Here is an example of an actual character:

Agility: 15
Brawn: 20
Focus: 12
Fortitude: 20

Action Points: (Focus * 0.2) + (Fortitude * 0.2) = 2  + 4 = 6
Defense: (Agility * 0.6) + (Focus * 0.2) = 9 + 2 = 11
Health: ((Fortitude * 0..6) + (Brawn * 0.2)) * HealthMod = (12 + 4) * HealthMod = 16 * HealthMod
Melee Attack: (Brawn * 0.6) + (Agility * 0.2) = 12 + 3 = 15
Ranged Attack: (Focus * 0.6) + (Agility * 0.2) = 7 + 3 = 10
Resistance: (Brawn * 0.2) + (Fortitude * 0.2) = 4 + 4 = 8

To clean up the above Derived Characteristics, they would have the final values of:
Action Points: 6
Defense: 11
Health: 16 * HealthMod
Melee Attack 15
Ranged Attack: 10
Resistance: 8

Here is the code I am using to do these calculations:

public void RefreshBase() { //Get the Derived Characteristics from the Base Characteristic set Derived = CalcDerived(Base); } private int healthModifier = 4; private double pMod = 0.6; //Primary Modifier private double sMod = 0.2; //Secondary Modifier private DerivedCharacteristics CalcDerived (BaseCharacteristics baseIn) { DerivedCharacteristics derived = new DerivedCharacteristics(); derived.MeleeAttackMod = FloorToInt(((double)baseIn.Brawn * pMod) + ((double)baseIn.Agility * sMod)); derived.RangedAttackMod = FloorToInt(((double)baseIn.Focus * pMod) + ((double)baseIn.Agility * sMod)); derived.Health = (FloorToInt(((double)baseIn.Fortitude * pMod) + ((double)baseIn.Brawn * sMod))) * healthMod; derived.ActionPoints = FloorToInt(((double)baseIn.Fortitude * sMod) + ((double)baseIn.Focus * sMod)); derived.Defense = FloorToInt(((double)baseIn.Agility * pMod) + ((double)baseIn.Focus * sMod)); derived.Resistance = FloorToInt(((double)baseIn.Brawn * sMod) + ((double)baseIn.Fortitude * sMod)); return derived; } private int FloorToInt(double value) { return (int)System.Math.Floor(value); }

That is the basis for the stat system in Heroes' Journey. I think it will lead to interesting game play, but I'm just not getting the game to a state where I can really start testing the mechanics and get a feel for if they will actually be usable. Since I have never developed my own stat system before I'm sure that while I'm testing that all of these values with be tweaked, or completely redone.

In the next post I'll probably go over what I am currently using for basic damage calculation (No Skill affects).

Till next time!


Tuesday, February 10, 2015

It's Been A While

Hello Everyone!

It sure has been a while, hasn't it? I ended up getting the job I mentioned in one of my last posts, and that has kept me really busy. I even got sent across the country for a couple weeks! Things are finally settling down to where I have been able to start working on game development again.  Here's what I've been up to!

Winds of Commerce                                                                         

I took a look at what I had previously made for Winds of Commerce, and taking what I have learned since I put it on hold, I think if I want to continue on with that I will end up remaking it from scratch. There is a lot of code that I am not happy with, and going forward I think it would be more work trying to build the new code from the existing code base than it would be start over and have a better design of the whole thing. This is especially true for when I would need to add enemy AI. The existing code is not very modular, and it would just be adding to the disorganization to continue on with this code base. In the end I'm going to shelve the game until a later date. I may create it in a different engine, since UDK is not really suited for running what essentially is a 2D game. There is a lot of overhead that isn't being utilized.

New Project                                                                                       

I was playing Sonny a couple weeks ago and thought that something like that might be an interesting game type to try and make. I spent about a week designing the base combat system (since that game style is almost solely combat) and I got a system I was happy with. I haven't been able to test it in a real life situation, so it might have to be overhauled once I get a chance to test it. Basically you have four base stats that six other stats are derived from. The six derived stats are what are used in combat to determine your effectiveness. There are also boons and skills that can affect different aspects of combat.

Given what I decided to do with Winds of Commerce, I sat down and looked at some of my options for game engines. I wanted to stay with a language I was already familiar with so that left m with either Flash (AS3), UDK (Unrealscript), Construct2 (Visual Scripting), or C#. I immediately ruled out UDK, for the same reason I don't think it was a good choice for Winds of Commerce. I also ruled out Construct2 because I think setting something up with the all the features I want, while doable, would be overly complicated using Construct2. That left me either using Flash, or finding a game engine that uses C#. I was leaning more towards C# since I use it at work and have gotten used to some of the features it has, and working in Visual Studio. I found that the Unity game engine supports Java, C#, and Boo script. Unity has a lot of built in support for doing 2D games, including sprite sheet handling, layers, and a pretty cool animation state editor. I could also do all of my code development directly from Visual Studio and utilize the power that it offers with Intellisense and refactoring, among others. To me, this made the decision easy since Unity offers almost everything that Flash offers, with most of them being better than Flash.

I plan on going through documenting the process I'm going through. I'll save that for another post since this one is getting a bit long.

Complimentary Code Bit                                                                 

To wrap things up here is some code I am using. For drawing the GUI elements you have to provide a rectangle to tell it where and how big to draw the GUI element. It didn't make much sense to me to have all of that be calculated every frame since mine won't be moving at all. To make this easier I created a small class to create the rectangle for me, as well as store other data as I need to. It is essentially a glorified Rectangle class, but it allows me a bit more flexibility, plus I can add any other fields I want associated with a particular GUI control, such as an image or particular GUI Skin.

Here is the class:

public class Control { private int x = 0; private int y = 0; private int width = 0; private int height = 0; private int bottom, top, left, right; private Rect rectangle; public int X { get {return x;} } public int Y { get { return y; } } public int Width { get { return width; } } public int Height { get { return height; } } public int Bottom { get { return bottom; } } public int Top { get { return top; } } public int Left { get { return left; } } public int Right { get { return right; } } public Rect Rectangle { get { return rectangle; } } public Control(int newW, int newH) { width = newW; height = newH; UpdateBounds(); } public Control(int newX, int newY, int newW, int newH) { x = newX; y = newY; width = newW; height = newH; UpdateBounds(); } private void UpdateBounds() { left = x; top = y; bottom = top + height; right = left + width; rectangle = new Rect(x, y, width, height); } public void SetWidth(int newW) { width = newW; UpdateBounds(); } public void SetHeight(int newH) { height = newH; UpdateBounds(); } public void SetX(int newX) { x = newX; UpdateBounds(); } public void SetY(int newY) { y = newY; UpdateBounds(); } }

Here is how you would initialize a Control:

private void InitializeBackground() { panBackground = new Control(800, 800); panBackground.SetX((Screen.width / 2) - (panBackground.Width / 2)); panBackground.SetY((Screen.height / 2) - (panBackground.Height / 2)); }

And here is how you would use it in the OnGUI method to create a button:

public void OnGUI() { GUI.Box(panBackground.Rectangle, GUIContent.none); }

Thanks for reading!

Friday, April 11, 2014

Some Completed Projects 3/3 - Village Trader

Hello everyone!

This post is the third of three presenting information on a couple of projects I've completed in the last two weeks.

After I finished up with the resource buildings in UDK I decided to try a similar concept in C#. Since I couldn't think of another project to do in C#, I figured I'd give it a shot. I figured this would give me a chance to learn a few more controls from the Visual Studio Toolbox, like panels and a progress bar. I had also planned to learn how to use the Task Parallel Library to do multithreading for the resource gathering, but that ended up being way over-complicated, so I used timers instead(I would essentially be creating a timer with the new tasks) since they supported all the features I needed without a lot of work.

The game (besides being really boring) puts you as a trader who has contracts with several resource gatherers(Steel, Candles, and Wheat). You provide these gatherers with workers and you can collect any resources they gather. You can then sell these resources to establishments in the local community (Blacksmith, Cathedral, and Windmill respectively) for a profit. After a variable amount of time it displays how much gold you made and your average gold per second. You can choose between a 3, 5, or 10 minute duration. Here are screenshots of the game, and you can download it here:


The gold and average is different on this due to the
screenshot coming from a different round.


There is a lot of balancing that would need to go into this to be remotely entertaining, as well as some structural changes. Since this was a C# learning project, not a game development one, I chose to leave out a lot of the balancing in order to complete it faster.

I learned quite a bit from this project, which was good. I learned that working with panels to create a 'paged' WinForm is tedious, unless there is some way to hide the panels in the editor. I read about using a tab control to achieve a more designer friendly 'paged' window, but that came with its own set of issues. It seems to me that the panel method is difficult at design time, but nice at runtime, while the tabbed method is easy at design time and (potentially) difficult at runtime. I also learned more about timers and how to update a progress bar based upon how far along the timer is. I also worked with picture boxes, which I hadn't used before.

Another thing I learned was how to make a custom UserControl. I had made one previously for another small project, but I didn't add any custom events that could be called so interactions between the control and the main form were messy to say the least. On this project I actually took the time to learn how to add custom events properly.The control I made was essentially a numeric stepper(or a NumericUpDown in C#/Visual Studio). I decided on creating my own because I wanted specific methods to run when I either increased or decreased the value of the stepper. The default stepper only has a ValueChanged event so I would have had to save the old value to a variable the compare it to the new one and see if it increased or decreased. I also didn't want the user to be able to input their own number into the textbox, since this would be displaying the amount of workers assigned and I wanted all the numeric checks to run through my custom Increased/Decreased events. I also wanted the control to blend in with the background more, so by default it has a gray background.  Here is a comparison between my custom stepper and the NumericUpDown:


I think that about wraps up the little projects I've been working on recently. There have been tutorials, but nothing too spectacular.


Some Completed Projects Part 2/3 - Resource Buildings

Hello everyone!

This post is the second of three presenting information on a couple of projects I've completed in the last two weeks.

During a break from a C# tutorial I was playing a round on Stronghold Crusader and I was looking at the resource gathering buildings and thought, "Hmm, I wonder if I can make something like that..." I've been interested in attempting to make an RTS after Winds of Commerce, but I think I have a lot of learning to do. Anyway, I decided to let my mind drift away from C# and back into Unrealscript. I decided to try and make a stone mine that gathers up to three units of stone if there are enough workers to run the building. Here is a demo that I made for it:


I added in some rudimentary functionality to select different buildings. Ideally this would be done via a point and click mouse system, but that was not my primary focus for this project. It just uses a trace to see if the actor that was hit was a resource building, then assigns the hit building to the currentBuilding. If I were going to make an RTS this would only be a small part of the game, but it was fun to do. Learned some stuff about the trace function, and getting a specific instance of an object.

There are only a couple things I would like to add to the building. One is actual animations to show the stone being mined. Another is some indicator as to whether or not the building is fully staffed. Scaling the buildings up to the correct size would also be nice. The last thing I would probably do is add some sort of graphical interface to aid with all of the tasks.

Friday, February 21, 2014

A Little Detour To Revisit a Old Side Project

Hello everyone!

My buddy Andrew contacted me the other day and asked if I wanted to help him redo a lot of the stuff that we made for SpaceWings now that we have a bit more experience. So, we dredged up as many of the old files that we could and got to work figuring out what we needed to redo. He wanted to tackle most of the base code himself, while I took on getting the menus put together.

Unfortunately, the only assets we had from the original menus were screenshots. A bit of Photoshop magic and I had almost all the elements I needed. A major thing I was still missing was the font. None of the other guys that worked on it before that I talked to had the name of the font we used in the original. So, I had to find some new fonts. I then had to try and replicate the effects that Justin Bucher made for the originals. He's much more proficient at Photshop than I am though, but I did my best.

Here are some of the HUD assets:


Once I got the main aspects of the menus done I decided to start working on getting the pickup system working. This has four main parts to it: Picking up and classifying an item, adding to the inventory if applicable, updating the HUD if something was added to the inventory, and checking to see if the player has a particular item. 

Picking Up and Classifying

Getting the item to be picked up proved to be surprisingly difficult for me. I haven't really worked with skeletal meshes/skinning/animation before in UDK. I got almost all of it set up thanks to some help from Andrew, mostly setting up the anim tree. The part that kept throwing me off was the collision. To get collision on a static mesh is really easy, but I was having a trouble with a skeletal mesh. Turns out I was looking at too much code and over looked adding BlockNonZeroExtent = true default properties of the skeletal mesh component...

As for classifying it, there is a variable in the actual pickup that holds what type of pickup it is. When the pickup is touched it calls a function in the player controller class that takes that variable and decides what to do with it. Here is my base pickup class:

class SW_Pickup extends Actor abstract placeable ClassGroup(SW_Pickups); var string PickupType; var SpaceWingsPlayerController PC; var SpaceWingsPawn P; event Touch(Actor Other, PrimitiveComponent OtherComp, vector HitLocation, vector HitNormal) { PC = SpaceWingsPlayerController(GetALocalPlayerController()); P = SpaceWingsPawn(PC.Pawn); PC.MyLog("A" @ PickupType @ "Pickup was touched", 'PickupTouch'); //If the instigator is the player, then process the pickup if(Other == P) { PC.ProcessPickup(PickupType); Destroy(); } } defaultproperties { PickupType = "None" Begin Object Class=SkeletalMeshComponent Name=PickupMesh Scale3D=(X=1.0, Y=1.0, Z=1.0) CollideActors=true BlockNonZeroExtent=true End Object Components.Add(PickupMesh) CollisionComponent=PickupMesh bCollideActors = true bBlockActors = false CollisionType = COLLIDE_TouchAll }
And then all you have to do is extend off of that and add the relevant skeletal mesh properties in the defaultproperties of the child class and assign the item type to that variable I mentioned earlier. For example, here is the the red key card pickup class.
class SW_RedKeyCardPickup extends SW_Pickup; defaultproperties { PickupType = "RedKeyCard" Begin Object Name=PickupMesh SkeletalMesh=SkeletalMesh'SW_Meshes.KeyCard.KeyCard' Materials(0)=Material'SW_Meshes.KeyCard.RedKeyCard_Mat' AnimSets(0)=AnimSet'SW_Meshes.KeyCard.KeyCard_Anim' AnimTreeTemplate=AnimTree'SW_Meshes.KeyCard.KeyCard_AnimTree' PhysicsAsset=PhysicsAsset'SW_Meshes.KeyCard.KeyCard_Physics' End Object }

Adding To My Inventory

Adding it to the inventory was really simple. Since the inventory can hold a maximum of 3 items I didn't need to implement a grand inventory manager. For simplicity I assigned each pickup that could be added to the inventory a number instead of trying to save a class into the array, or something overly complex like that. I could have done a string, but I end up using the id number when updating the HUD. Here are the functions that manage my small inventory:
exec function AddItem(int ItemID) { local int i; if(ItemList.length < 3) { i = ItemList.length; ItemList.length = ItemList.length + 1; ItemList[i] = ItemID; HUDGFx.UpdateItems(); } else { MyLog("ItemList is full", 'AddItem'); } } function bool CheckForItem(int ItemID, out int FoundItemID) { local int i; local bool bHaveItem; bHaveItem = false; for(i = 0; i < ItemList.length; i++) { if(ItemList[i] == ItemID) { bHaveitem = true; FoundItemID = i; } } return bHaveItem; } //This would be used like this in whatever function needs the check //If not being called from this class, get PC reference like normal /* local int FoundID; if(CheckForItem(1, FoundID)) //If we have a keycard (ID 1) { RemoveItem(FoundID); //Insert the rest of the code that happens if they have the keycard } */ exec function RemoveItem(int ItemID) { ItemList.Remove(ItemID, 1); HUDGFx.UpdateItems(); }

Updating the HUD

Now that I have all of that in order I have to update the HUD to show which items I have in my inventory. As I do more and more Scaleform projects I try and migrate as much code as I can from AS3 to Unrealscript, since Unrealscript runs faster than AS3. Since I will be spawning movieclips directly from Unrealscript I have to keep a reference to them in order to adjust them or delete them. To help manage my references I decided to make my AttachMovie function a bit more dynamic on what parameters are passed. The first step was to create an array that holds the linkage names(to match the ones in Flash) and the desired instance names for all of the different item types that can be added to the inventory. The element number then corresponds to the ID I gave the items when I added them to the inventory. Here is how I have the AttachMovie and the reference array set up:
var struct ItemInfo { var string LinkageName; //Name used in Flash var string InstanceName; //Desired Instance Name } ItemReference; //ItemSlot[0] holds the id number of the item assigned to that spot. ItemOneSlot.AttachMovie(ItemReference[ItemList[0]].LinkageName, ItemReference[ItemList[0]].InstanceName); ItemOneMC = GetVariableObject("_root.itemOneSlot_mc." $ ItemReference[ItemList[0]].InstanceName); //In the defualt properties ItemReference[1] = (LinkageName = "redKeyCard_item", InstanceName = "redKeyCard") ItemReference[2] = (LinkageName = "blueKeyCard_item", InstanceName = "blueKeyCard")

CheckForItem Kismet Node

Since I like using Kismet for setting up triggers and other level specific things I needed a way to check if I had the correct item before the actual action could be executed. For instance, if they have the red keycard when trying to lower the force field. If they don't have it they shouldn't be able to lower it. So I made a custom Kistmet node that calls my check inventory function in my PlayerController class(see above), then outputs the correct result. I wanted to be able to set which item was being checked and also if I wanted it to be removed when the check was made. If I had like a master key card or something that could be used over and over again I wouldn't want it to be removed from my inventory. Anyway, here is my Kismet node:
class SeqCond_CheckForItem extends SequenceCondition; var bool bResult; var int ItemID; /**Remove the item if found? */ var(Items) bool bRemove; /**Expected Item Type*/ var(Items) enum ItemTypes { ITEM_RedKeyCard, ITEM_BlueKeyCard } ExpectedItem; event Activated() { local SpaceWingsPlayerController PC; PC = SpaceWingsPlayerController(class'WorldInfo'.static.GetWorldInfo().Game.GetALocalPlayerController()); bResult = PC.CheckForItem(ExpectedItem + 1, ItemID); if(bResult && bRemove) { PC.RemoveItem(ItemID); } //If the check result is true, activate the first output link, else the second OutputLinks[(bResult == true) ? 0 : 1].bHasImpulse = true; } defaultproperties { ObjName="CheckForItem" ObjCategory="SpaceWings" bRemove = true InputLinks(0)=(LinkDesc="In") OutputLinks(0)=(LinkDesc="True") OutputLinks(1)=(LinkDesc="False") VariableLinks(0)=(ExpectedType=class'SeqVar_Bool',LinkDesc="Result",bWriteable=true,PropertyName=bResult) }

Wow, this post ended up being a lot longer than I had anticipated. I was going to throw up a video of the pickups and HUD in action, but that will have to wait until later. Time to work!